HOW TO REPLACE THE BATTERY IN THE YAESU FTDX101
I
purchased a fully loaded FTDX101D from HRO about 2022. I heard there
was a battery inside, and became concerned that its life may be about
over. Expected life is 5 years with regular daily charging. If
you do not turn the radio on for a good period of time at least once
a week, it may be much shorter. So, I
researched this problem and I am sharing it here.
The bad news
is that there is a battery inside the FTDX101.
The next bad news
is that it is located on a board that requires disassembly to get to
it.
The next badder news is that it is not a standard CR2032
computer battery.
The worst news is that the battery is a style with tabs that is soldered onto the circuit board.
I
am not pleased with this design choice.
This is a really annoying Yaesu move, planned obsolescence, expensive trip back to the factory for a battery to be soldered in! But it got by the warranty period. For those of us who are DIY, I have done some research shown below.
The
good news is that it probably is not as bad a problem as the
notorious IC-751, which literally turned into a brick when the RAM
battery discharged, losing the operating system for the radio.
I
do not plan a Youtube video or a Heathkit style step by step. If you
are not comfortable working on your own from these instructions, I am
not going to provide any more. You will have to bite the bullet and
pay for a professional to fix it for you. NOTE: I have not done this
procedure yet. When it comes time, I want a plan in place, and I am
sharing it with you. YOU alone are responsible for any damage or
costs related to your attempts to repair your FTDX101, understand?
HOW BAD IS THE PROBLEM?
I do not know at this time what functions are powered by the battery. At present, it appears that at least the real time clock is powered from the battery. This is necessary for a time stamp on any files saved to the SD card plugged in to the front socket. If you need to save or modify any files, be sure to set the clock first when you power up. This also will affect any files you save to the SD card, such as: Screen shots, control settings, channel frequencies and settings, etc
Note that any knob based settings are likely not saved in the SD card may be lost, I don't know
There is a program from RT systems which may help you configure and back up some of this data, but it is not free:
https://www.rtsystemsinc.com/Yaesu_c_27.html
Its insane to work on equipment of this complexity without a service manual. Fortunately there is a free one on the web. Put the screwdriver down right now and download it right now before you start anything.
COMPLETE SERVICE MANUAL FREE DOWNLOAD
http://www.radiomanual.info/schemi/YAESU_HF/FTDX-101D_MP_serv_2020.pdf
GETTING STARTED
Next you are going to have to decide whether you want to use a solder in battery exact replacement like the OEM part or if you are going to use a socket like they should have done in the first place, so the job is easy the next time you have to do this chore. Use the Yaesu part number for the battery with the solder tabs; you can also source the battery from Digikey or Mouser. Order it now before you get started and have it on hand before you begin disassembly. Some people seem to suggest using a CR2032 battery; however, I don't because a different battery than the OEM style might not be compatible with the charging circuit. Do you want to take that chance with a $3500 radio?
One
place to get the battery with tabs
is:
https://www.k-po.com/product/yaesu-ml614r-tt31
|
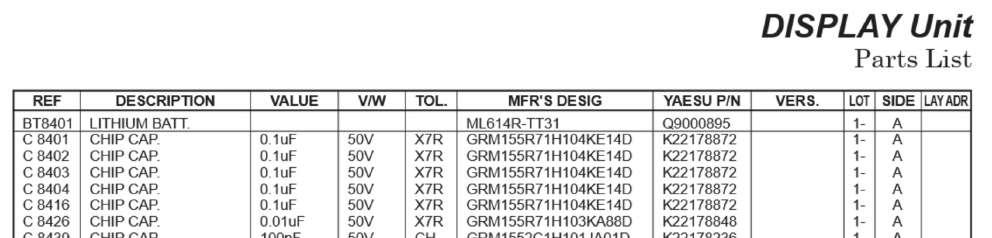
Yaesu - ML614R-TT31 Lithium battery located on display unit BT8401 Yaesu PN Q9000895 |
If
you want to use a battery holder, you can get the holder from
Digikey.
Amp batt holder from Digikey $4.20
pn 1376164-1 te connectivity amp connectors
https://www.digikey.com/en/products/detail/te-connectivity-amp-connectors/1376164-1/4031223
NOTE: TO USE THIS BATTERY HOLDER, ORDER THE BATTERY *WITHOUT* THE TABS
https://www.fdk.com/product_e/lithium_e/coin_mnli/
WHERE IS THE BATTERY LOCATED INSIDE THE FTDX101?
This
is a rough outline of how to repair and replace the battery in the
FTDX101. I have not done this yet, I am working from the Yaesu
service manual. Obviously, power should be
disconnected.
All
work should be done at a Static Free Work Station with a wrist
grounding strap. Soldering irons must also
be grounded to avoid static discharge. Serious damage will result if
you do not observe this basic precaution. If you do not have the
right equipment to do this, or are uneasy with this project, STOP
NOW and get a professional to do the work for you.
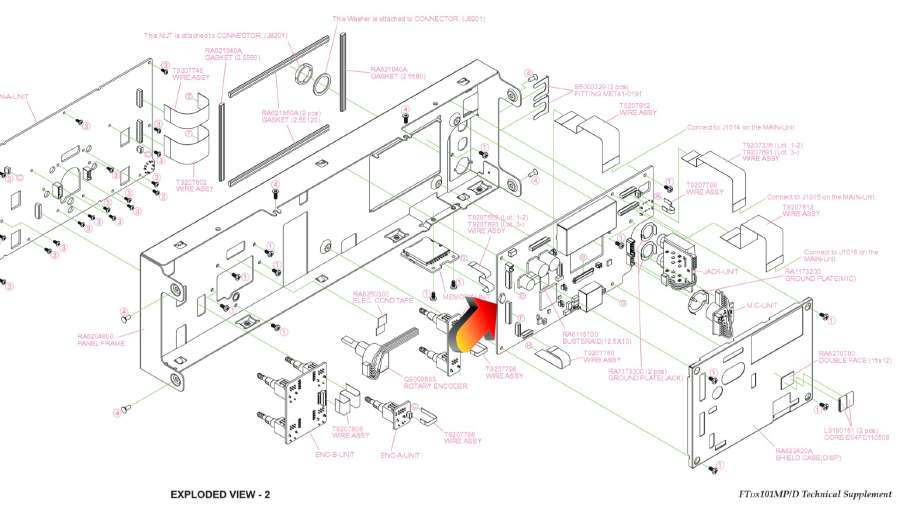
You
will have to remove the top cover. Be sure to not damage the speaker
or its wiring. The battery is found on the display board just behind
the LCD display. Don't damage the display.
It appears that
you will have to remove a shield to access the display board where
the battery is located.
Be
extremely careful of any ribbon cables that you remove to not damage
the socket or cable. If you can just swing the shield out of the way
without demating any cables, it might be better to do that.
REMOVING THE BATTERY
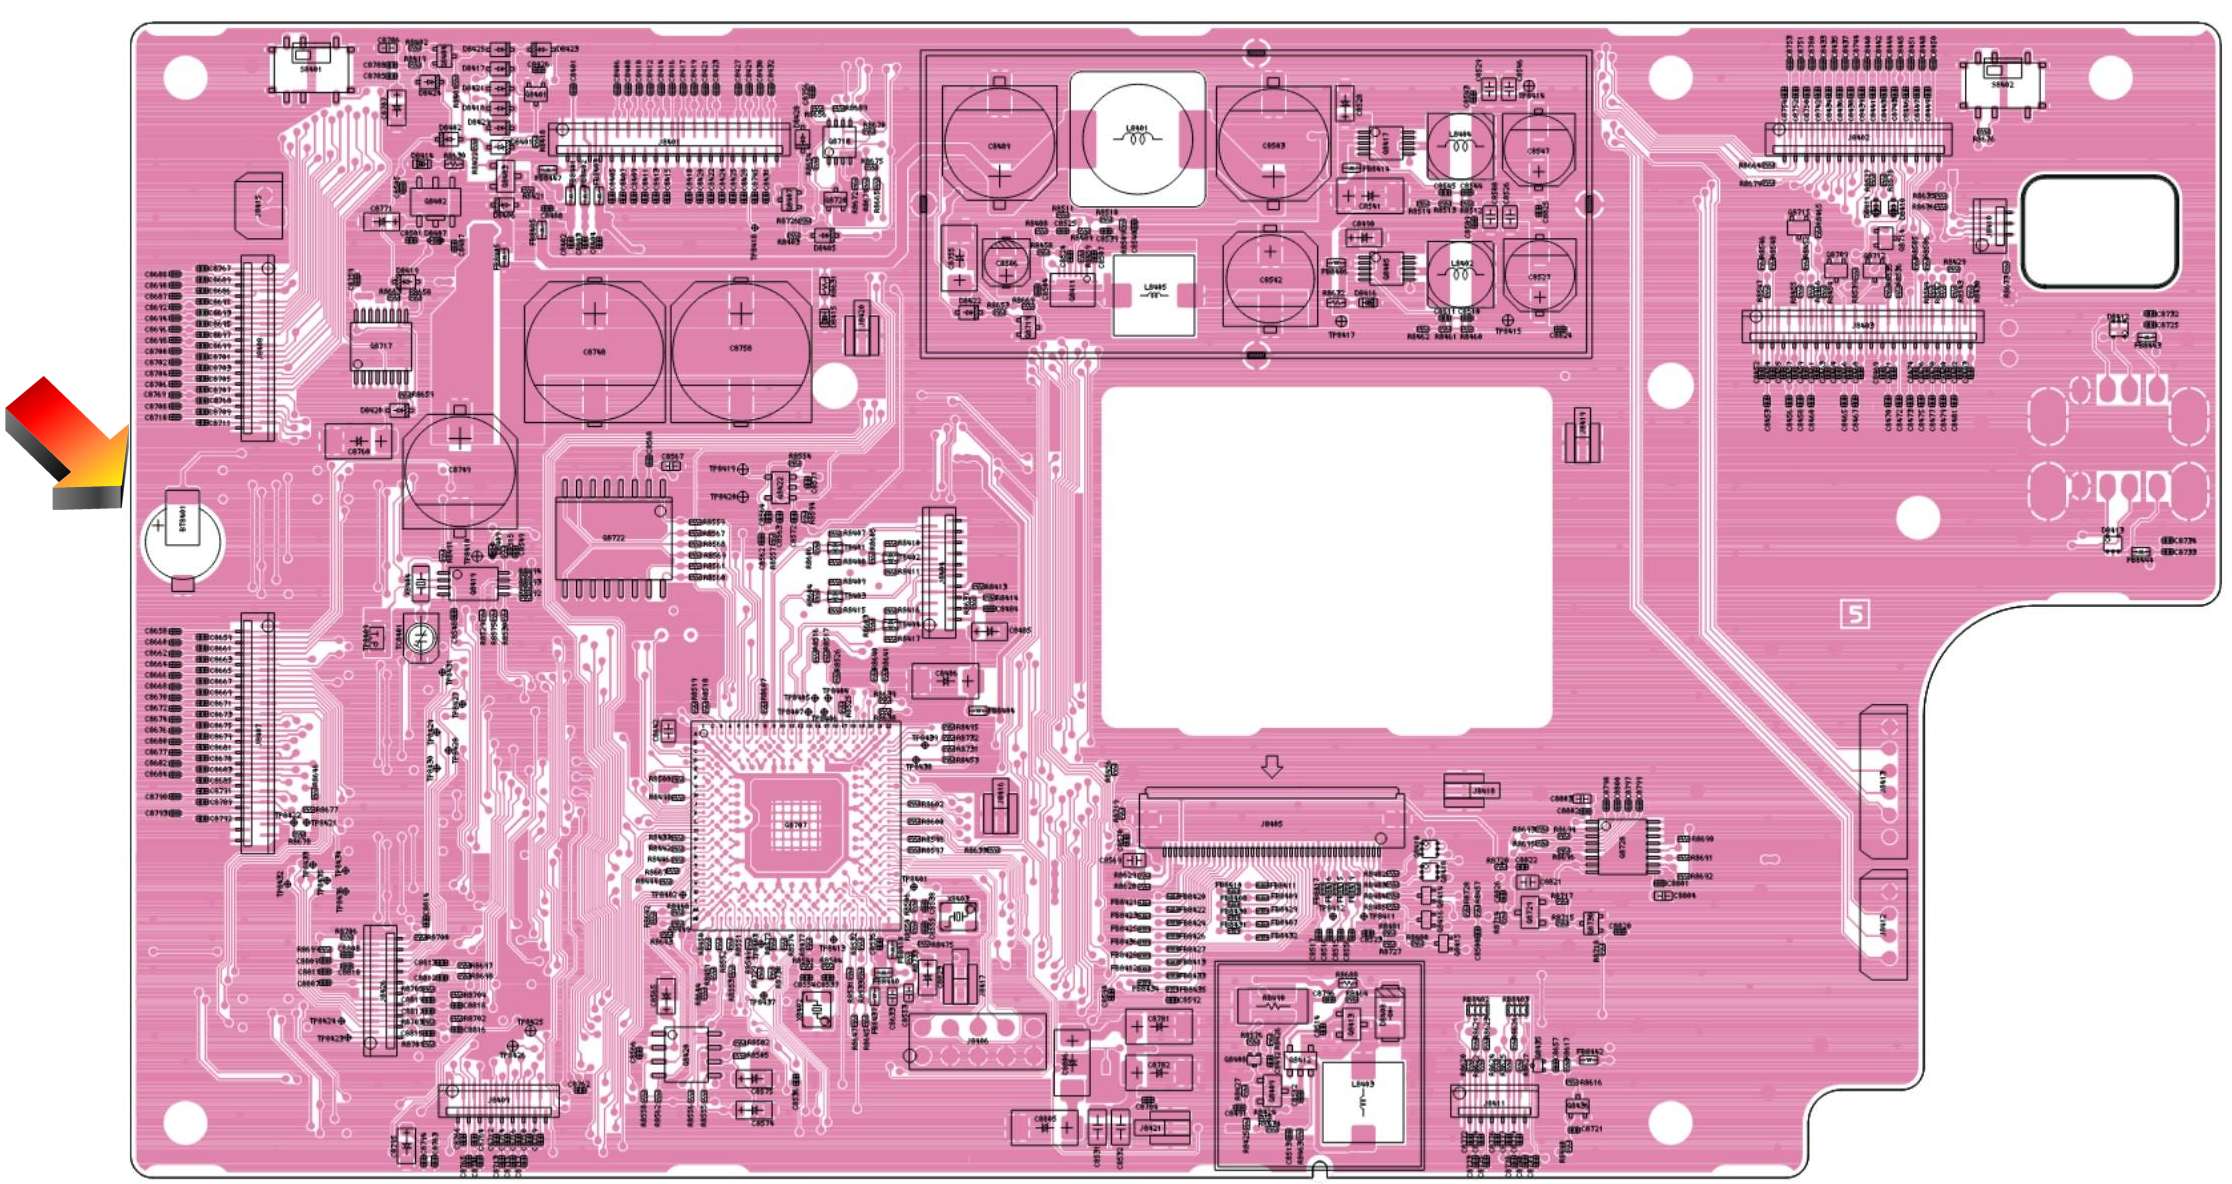
The battery is located on the board as shown in the pictorial below.
NOTE: Mark and observe the polarity of the battery before you remove it! Getting it backward will cause severe damage.
Do not damage any cables with the soldering iron or tools.
The solder used on the board is lead free solder, with a higher temperature melting point. Do not damage the board getting it off. Solder wick or a solder removal iron would be helpful. There is also a low temperature method of removing parts like ICs from boards called Chip Quik. Amazon sells small kits.
I just grab the part and heat up one tab and gently remove them one at a time on jobs like this. Do not force this or you will lift the trace from the fibreglass. Then remove the second tab and do not drop it. Clean the pc board lands. Resolder it using regular 60/40 tin lead solder. I hate lead free solder, it eats up a solder tip in just one day, and the solder joints all look frosty. There is no way to verify a good joint.
https://www.amazon.com/smd-removal-alloy/s?k=smd+removal+alloy
Do not short a partially charged battery to anything or it could cause permanent damage. Once the battery is loose, do not let it fall into the radio or onto another board. Put a non conductive piece of cardboard or something under the display board to catch the battery just in case.
REPLACING THE BATTERY
If you bought the stock battery with attached tabs, solder it back where you removed the old one. Be sure to get the right polarity when installing. Severe damage will result if you get it backward.
If you are going to use a socket, you must figure out how to install the socket and battery without shorting to the metal shield cover. Maybe it needs to come to the side on some stiff bare wire leads, poking out to the side. Or maybe you need to cut a small notch in the shield with a pair of tin snips. This could cause signal leakage that will compromise the performance of the receiver due to spurious signals. Make the hole as small as possible to allow battery replacement without having signal leakage. This is pure speculation on my part, since I have not done this procedure. If there is any doubt on your part, stick with the battery with tabs and solder it back in as originally designed.
Good
luck with your battery replacement.
73, Janis AB2RA